digiKam is an advanced digital photo management application for Linux, Windows, and Mac-OSX.
The people who inspired digiKam's design are the photographers like you who want to view, manage, edit, enhance, organize, tag, and share photographs under Linux systems.
Tuesday, December 14, 2010
Friday, October 15, 2010
Tiny Core Linux 3.2 released
Tiny Core Linux is a very small (10 MB) minimal Linux GUI Desktop. It is based on Linux 2.6 kernel, Busybox, Tiny X, and Fltk. The core runs entirely in ram and boots very quickly. Also offered is Micro Core a 6 MB image that is the console based engine of Tiny Core. CLI versions of Tiny Core's program allows the same functionality of Tiny Core's extensions only starting with a console based system.
It is not a complete desktop nor is all hardware completely supported. It represents only the core needed to boot into a very minimal X desktop typically with wired internet access.
The user has complete control over which applications and/or additional hardware to have supported, be it for a desktop, a netbook, an appliance, or server, selectable by the user by installing additional applications from online repositories, or easily compiling most anything you desire using tools provided.
Thursday, October 07, 2010
Qt SDK 2010.05.1 for Linux released
After the 2010.05 release of the Qt SDK, which accompanied Qt 4.7.0, we got word that Creator and the apps created with the packaged Qt would not look native on Gnome. This was caused by a missing GTK style plugin, which caused Qt to fall back to the non-native CleanLooks style.
The now released 2010.05.1 packages address this specific issue. Qt SDK 2010.05.1 is thus only available for x86 (32-bit) and x86_64 (64-bit) Linux environments.
Source: Qt Labs - Developer Blogs: Qt SDK 2010.05.1 for Linux released
Friday, September 10, 2010
Convert MP4 to FLV on ubuntu
In Ubuntu, start Synaptic Package Manager, search the following two packages, and mark for installation.
ffmpeg
This package contains the ffplay multimedia player, the ffserver streaming
server and the ffmpeg audio and video encoder. They support most existing
file formats (AVI, MPEG, OGG, Matroska, ASF...) and encoding formats (MPEG,
DivX, MPEG4, AC3, DV...).
avidemux
Avidemux is a free video editor designed for simple cutting, filtering and
encoding tasks. It supports many file types, including AVI, DVD compatible
MPEG files, MP4 and ASF, using a variety of codecs. Tasks can be automated
using projects, job queue and powerful scripting capabilities.
Friday, August 06, 2010
How to check MAC address on Ubuntu
Start a Terminal, type the command:
You will see your MAC address in HWaddr of your device.

$/sbin/ifconfig
You will see your MAC address in HWaddr of your device.

Thursday, June 17, 2010
Install c++ in ubuntu using Synaptic Package Manager
To install c++ in ubuntu, start Synaptic Package Manager from System of Ubuntu menu -> Administration
search g++ (GNC c++ compiler) and right click to mark for installation, and then mark additional required changes.

Click Apply
search g++ (GNC c++ compiler) and right click to mark for installation, and then mark additional required changes.

Click Apply
Wednesday, June 02, 2010
Install Sun JDK(JRE) on Fedora 13
Install Sun JDK(JRE) on Fedora 13
The steps below installs the Java SE Runtime Environment using an RPM binary bundle, on a 32-bit Linux as a example (include the newest Fedora 13).
Download JDK(JRE) RPM Linux from Sun's download page(http://java.sun.com/javase/downloads/index.jsp), to any directory that you want. For myself.
Start a Terminal (Fedora's Top Menu -> Applications -> System Tools -> Terminal) and switch to the downloaded folder.
Swith to SU
$su
and also enter the password.
set the executable permissions of the downloaded file.
$chmod a+x jdk-6u20-linux-i586-rpm.bin
execute the file.
$./jdk-6u20-linux-i586-rpm.bin
Accept the terms.
Finished!

The downloaded RPM file can be deleted after installation.
Wednesday, May 26, 2010
Google Chrome for Linux Stable version is available now!

Google Chrome for Linux Stable version is available now. In Ubuntu, it can be installed using Synaptic Package Manager.
To install Google Chrome for Linux Stable version on Ubuntu:
Click System -> Administration -> Synaptic Package Manager
Type Chrome in the search box
Mark google-chrome-beta for Removal if it was installed
Mark google-chrome-stable for Installation
Click Apply!

Sunday, May 09, 2010
Install sun-java6-jdk/sun-java6-jre on Ubuntu 10.04 LTS, using apt-get
In the new announced Ubuntu 10.04 LTS, the sun-java6-jdk packages have been removed from the Multiverse section of the Ubuntu archive. So you cannot install it using the command sudo apt-get install sun-java6-jdk directly!!!
To install sun-java6-jdk on Ubuntu 10.04 LTS, type the commands below in Terminal:
sudo add-apt-repository "deb http://archive.canonical.com/ lucid partner"
sudo apt-get update
sudo apt-get install sun-java6-jdk
or
sudo apt-get install sun-java6-jre
To install sun-java6-jdk on Ubuntu 10.04 LTS, type the commands below in Terminal:
sudo add-apt-repository "deb http://archive.canonical.com/ lucid partner"
sudo apt-get update
sudo apt-get install sun-java6-jdk
or
sudo apt-get install sun-java6-jre
Saturday, May 08, 2010
How to Hide/Display icon on Ubuntu desktop, using gconf-editor.
How to Hide/Display icon on desktop, gconf-editor.
Refer to the article "How to Restore KDE's Default Settings", many icons of the folder/files inside my desktop folder come-out on Desktop. I prefer a clean desktop without it.
To hide icon of desktop, gconf-editor can be used.
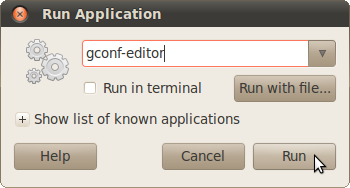
- Press ALT-F2 to call out Run Application Dialog, type gconf-editor in the Edit Text Box and click Run.
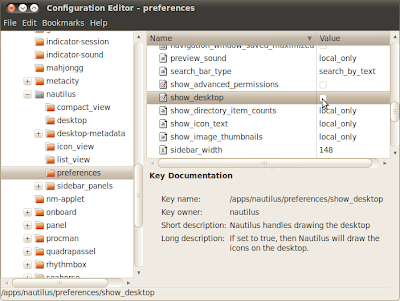
- Browse to /apps/nautilus/preferences/, un-check the value box of show_desktop
The icons gone now :)
Refer to the article "How to Restore KDE's Default Settings", many icons of the folder/files inside my desktop folder come-out on Desktop. I prefer a clean desktop without it.
To hide icon of desktop, gconf-editor can be used.
- Press ALT-F2 to call out Run Application Dialog, type gconf-editor in the Edit Text Box and click Run.

- Browse to /apps/nautilus/preferences/, un-check the value box of show_desktop

The icons gone now :)
Friday, May 07, 2010
How to Restore KDE's Default Settings
Restoring KDE's default setting can be done by deleting the following directories:
kde*
.skel
*Desktop
Please notee that all program settings will be reset to default. Therefore, all setting changed , include address books and e-mail settings, will be lost.
Enter the command in Terminal:
rm -rf .kde*/ .skel/ *Desktop/
Related article: How to Hide/Display icon on desktop, gconf-editor.
Tuesday, May 04, 2010
How to login as root in Ubuntu?
Normally, user cannot login as root in the login screen, because there are no password for root user in default. In order to login as root, a password for root user have to be set manually.
To set password for root user?
Start a Terminal and type the command:
sudo passwd
You will be as to type in the new root password twice. After that, re-login as root with the new password in login screen.
To set password for root user?
Start a Terminal and type the command:
sudo passwd
You will be as to type in the new root password twice. After that, re-login as root with the new password in login screen.
Saturday, May 01, 2010
Ubuntu 10.04 LTS
What is Ubuntu?
Ubuntu is an operating system built by a worldwide team of expert developers. It contains all the applications you need: a web browser, office suite, media apps, instant messaging and much more.
Ubuntu is an open-source alternative to Windows and Office.
The Ubuntu promise
* Ubuntu will always be free of charge, along with its regular enterprise releases and security updates
* Ubuntu comes with full commercial support from Canonical and hundreds of companies from across the world
* Ubuntu provides the best translations and accessibility features that the free software community has to offer
* Ubuntu core applications are all free and open source. We want you to use free and open source software, improve it and pass it on.
Saturday, January 02, 2010
How to mount ISO in ubuntu
Gmount-iso (gmountiso) is a small tool written using PyGTK and Glade. It allows you to easily mount your cd images. This is a frontend to the 'mount -o loop -t iso9660 foo.iso /mountpoint' command
Install gmountiso:
Start Synaptic Package Manager from Administration on top menu of ubuntu, type gmountiso in the Quich Search box. Right click on gmountiso and mark it to install. And then click Apply.

Create a mount point:
In order to mount a ISO, you have to creat a mount point somewhere, just create a folder on your desktop is OK.
Start gmountiso from ubuntu top menu:
Applications > System Tools > Gmount-iso

Just click Open to select Image File (.iso), and Mount Point, and then click the button mount.

Subscribe to:
Posts (Atom)

